Enable Nearby Sharing on Windows 11 (2021)
Microsoft first rolled out Nearby Sharing as part of the April 2018 update for Windows 10. The feature is also available in Windows 11, but is disabled by default. We will tell you all about Nearby Sharing, including what it is, how it works, how to enable and use it on your Windows 11 PC in this article. So without further ado, let’s get started!
What is Nearby Sharing in Windows 11?
Nearby sharing is a handy feature in Windows 10 and 11 that enables users to share documents, photos, links to websites, and any other content with other Windows devices close by over Bluetooth or Wi-Fi. The feature works similarly to AirDrop, which is widely used by Apple users for transfer content between MacBooks, iPhones, and iPads. However, there’s a reason why the Windows feature hasn’t seen as much success as its Mac counterpart. As of now, Nearby Sharing only works between two Windows PCs (whether it’s running Windows 10 or Windows 11) that have the feature enabled. It doesn’t allow you to share content with or from smartphones, tablets, or other devices running non-Windows operating systems.
Minimum Requirements for Nearby Sharing Support
Not all Windows computers support Nearby Sharing. Here are the minimum requirements for Nearby Sharing support on Windows PCs:
Both PCs must be running either Windows 10 or Windows 11. Bluetooth 4.0 (or later) with Low Energy (LE) support in both PCs. Both computers should be accessible via Bluetooth or Wi-Fi and need to have Nearby Sharing enabled. The donor and recipient need to be in close proximity.
Things to Remember Before Using Nearby Sharing
It takes more time to transfer files over Bluetooth compared to Wi-Fi. When sharing files over Bluetooth, make sure large amounts of data aren’t already being sent over Bluetooth, such as streaming audio over a wireless speaker. For the fastest file transfer speeds, ensure that the transfers are happening via Wi-Fi rather than Bluetooth. To do that, ensure that both devices are connected to the same Wi-Fi network and set the connection profile to ‘Private’ in both cases. You can do that by navigating to Settings -> Network and Internet -> Properties -> Private. You don’t need to pair the two PCs over Bluetooth to use Nearby Sharing. Both PCs just need to have Nearby Sharing enabled for file transfers to work. When Nearby Sharing is enabled, Bluetooth is automatically turned on for the feature to work as intended.
Steps to Enable Nearby Sharing on Windows 11
As mentioned above, Nearby Sharing can help you quickly share files over Bluetooth or Wi-Fi between two Windows 11/ 10 devices in the vicinity. Follow the steps below to turn on Nearby Sharing on your Windows 11 computer:
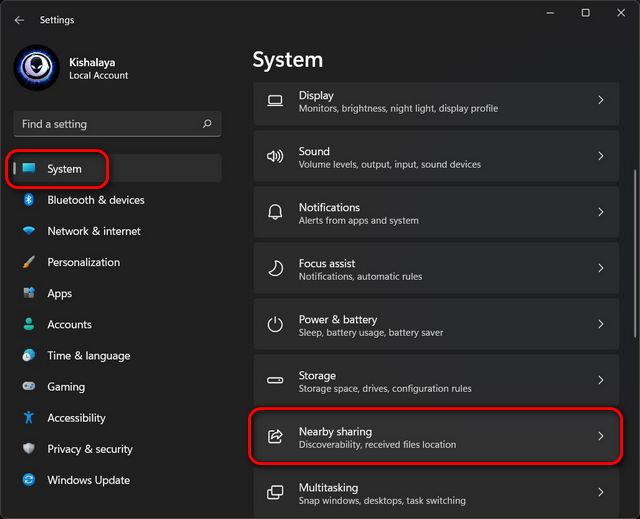
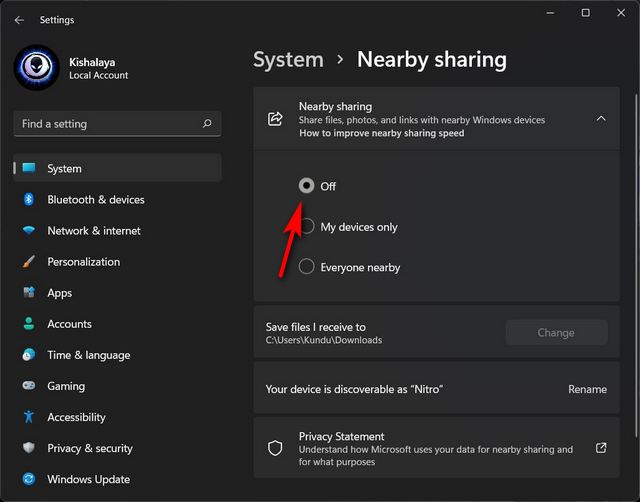
Open Settings using the Windows 11 keyboard shortcut ‘Windows key + I’. Then, click on ‘System‘ from the left sidebar and select ‘Nearby sharing‘ on the right pane.
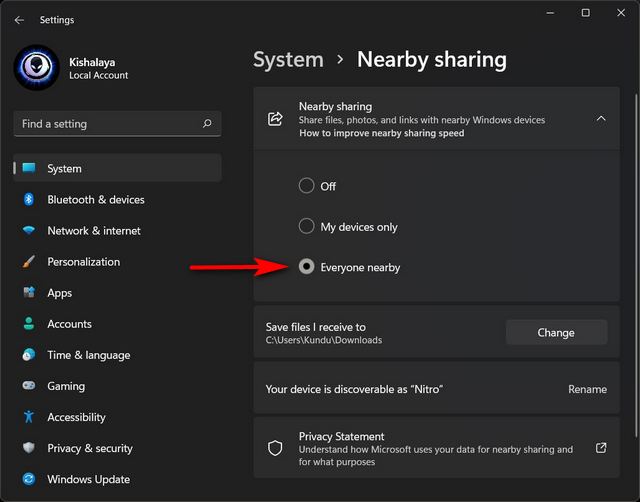
On the Nearby Sharing settings page, select whether you want to share files, photos, and links with all available devices nearby or only your own devices. Your preference will be auto-saved for future use.
Note: By default, shared files are saved in the ‘Downloads’ folder. However, you can click the ‘Change’ button next to the ‘Save files I receive to’ option on the Nearby Settings page to specify where you want to save the received files.
Share Files via Nearby Sharing in Windows 11
First off, to share documents or images between two devices via Nearby Sharing, you must enable the feature on both Windows 10 or 11 computers. After that, follow the guide below to proceed further.
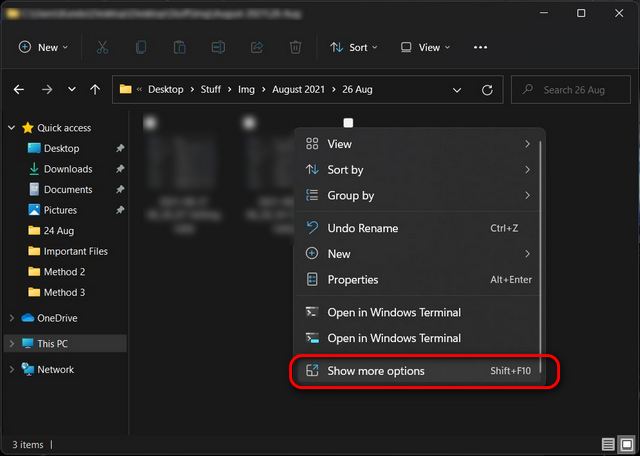
Use File Explorer to navigate to the file you want to share on your PC. Now, right-click on the target file and select ‘Show more options‘.
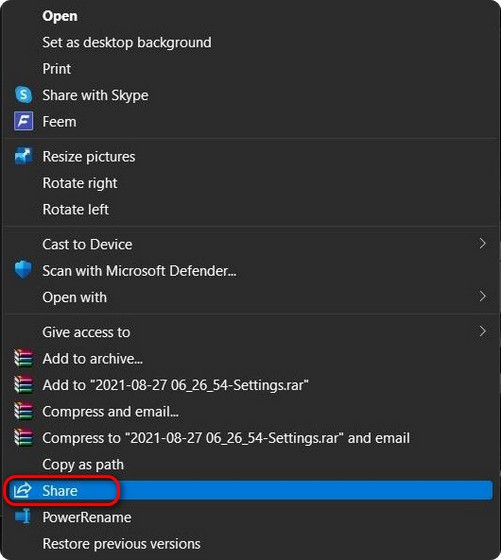
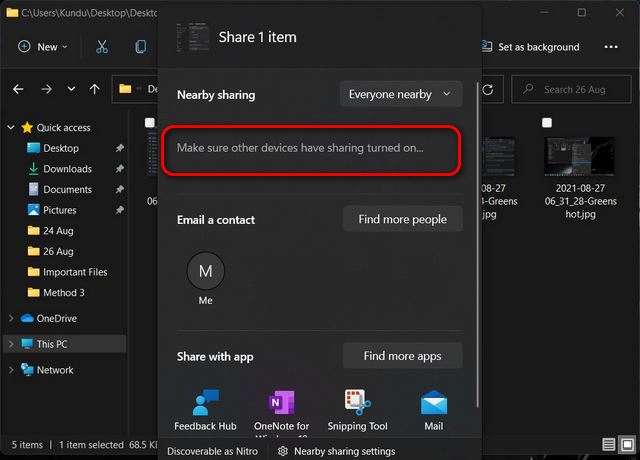
On the next context menu, select ‘Share‘.
If there are no available devices, Windows will ask you to make sure that the target device has sharing turned on. If there are multiple available devices, select the name of the device you want to share files with. You will now see a ‘Sharing to [PC name]’ notification while your computer is waiting for the other device to accept the sharing request.
Note: On the receiving PC, select either ‘Save‘ or ‘Save & open‘ to save the incoming file.
Share Website Links From Microsoft Edge via Nearby Sharing
You can also share links to any website or web page using Nearby Sharing in Microsoft Edge if both computers are running Windows 10 or Windows 11. Once you have ensured that, follow the guide below to share links to web pages via Nearby Sharing on Windows 11.
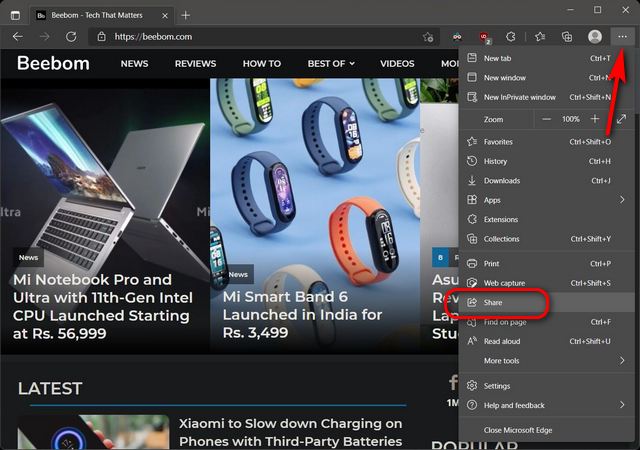
Open Microsoft Edge and navigate to the website or web page you want to share. Then, click on the ellipsis (three-dot menu button) at the top-right and select ‘Share‘ from the drop-down menu.
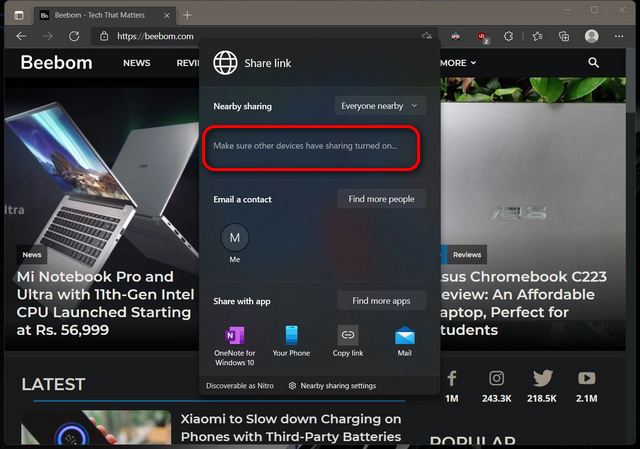
The name of the recipient’s PC will popup in the space where it says ‘Make sure other devices have sharing turned on‘. Once you select the recipient’s PC from the list, it will need to accept the sharing request to access the content.
Disable Nearby Sharing in Windows 11
Once you no longer have anything to share, it’s best to keep the Nearby Sharing feature disabled. Here’s how you do that:
Navigate to Settings -> System -> Nearby Sharing, as explained earlier. Here, under Nearby Sharing, select ‘Off‘ using the radio button next to it.
That’s it! You have successfully disabled Nearby Sharing on your Windows 11 PC.
Easily Share Content Between Windows PCs With Nearby Sharing
As you can see, it is easy to enable Nearby Sharing on your Windows 11 computer. Now that you know how to do that, check out how you can easily enable Nearby Share on your Android device. If you use an Apple Watch, you might also be interested in knowing how to share photos via Messages and Mail on Apple Watch. Finally, Chromebook users need not worry, as you can also enable Android’s Nearby Share function on your Chromebook to share files with other devices.
